I have several wall hangings in spectrum (rainbow) colors, except for one special black & white piece.
I found this older post today and since I’ve wanted to republish some that were archived, I decided to begin focusing on ones related to my sewing room.
After that, I’ll share photos of how the room looks now. It was always useful to have a reference when talking with a friend about our sewing rooms.
The post below was originally written on January 10, 2021.
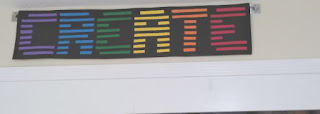
I saw the idea in an old magazine by Angela Bowman. She’d made one with the word “MAKE”. I loved it and wanted to use the word “CREATE” for mine. She used an 1980’s font called “Edit Undo Line Break”.
I searched online and found a free font to download. I initially thought I’d need to graph each letter, but after printing several sizes, I was excited to see that an 800 font size worked perfectly. I just measured each piece and added a 1/2″ seam allowance.
All strips were cut 1″ wide to finish at 1/2″, including the strips between the letters and the outside border.
The first one was made with ombre letters and a white background. I didn’t think it was going to look good on the wall color I had at that time so I remade it. The second time I used some leftover Kona jelly roll strips and a black background. (Each letter took less than one jelly roll strip).

When I first saw the photo from a distance, I liked both pieces! My husband suggested adding “Re-” to the second one for Create and Re-create. He’s a funny guy!
I haven’t checked my trunk of wall hangings in a while, but I think I gave the white one to another quilter. I probably should have kept it because I really liked ombre.
The wall hanging finishes at 8 1/2″ x 40″. It took a skinny quarter yard of fabric for the backing. I used 1/2 yard of fabric for the background and binding. I chose to make a single fold binding with 1 1/4″ strips since it’s only a decorative piece.
Here are the details in case anyone wants to save the idea. I think it would be a cute method to use and insert a child’s name in the backing of one of their quilts.
- Background, colored strips, spacing strips between letters, and border strips were all cut at 1″ wide (they finish at 1/2″)
- The letter blocks are unfinished 8″ x 6 1/2″ so you may need to adjust your page margins to “0” before printing.
- Each letter is made with 8 colored strips and 7 background strips.
I quilted it with a wavy serpentine stitch in the background rows. Super easy!!
You can downloaded the free font from 1001fonts.com. Just make sure to click the GREEN download button (the blue one is an ad that requires downloading an app).
